Step 3: Extending a Docker Image
Table of Contents
Objective: Create an SSL version of WordPress
Migrating WordPress to an SSL version requires two steps in the correct sequence. Making the changes in the wrong order could require database modifications to regain access to the site.
4.3.1. Change the WordPress URL to HTTPS
Let’s do this first so that you do not lock yourself out of your site.
Open the admin panel of your WordPress site.
Did you forget your password? You can reset it using Reset admin password.
Go to
Settings -> General SettingsChange the values to read
https
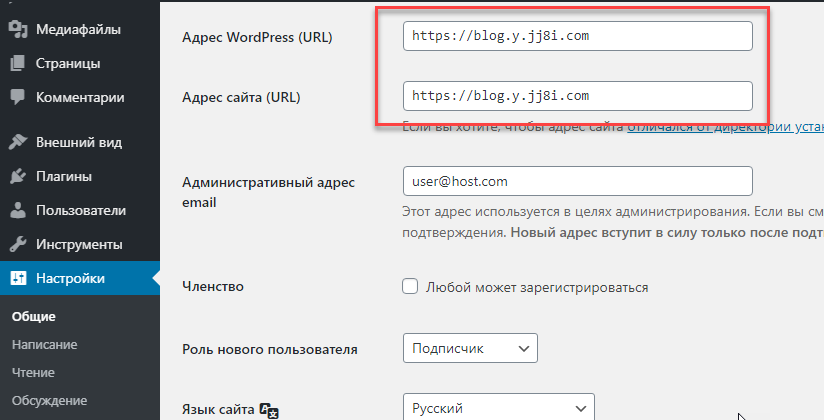
At this point, you cannot access your site until you configure an SSL transport layer.
4.3.2. Build the new WordPress Image
Extending an existing image is simple. We don’t have to rebuild
the entire project. We could clone the WordPress code from GitHub and
manually build the project using the base WordPress Dockerfile
for Apache, but we will let someone else maintain that Dockerfile.
We only need to base our image on an official WordPress image
of our choice. For this lab, we will use the latest Apache version
(wordpress:apache).
To enable SSL in an image, we need to:
Base our project from an existing image (
wordpress:apache)Enable the Apache modules required for SSL
Copy self-signed certificates
Build our custom image
We’ll start by creating our project directory and files.
Create the directory for our image and other files.
cd ~
mkdir wordpress-docker-image
cd wordpress-docker-image
touch Dockerfile
The image needs self-signed SSL certificates to work. We will create them using package
make-ssl-cert.apt-get -y install ssl-cert make-ssl-cert generate-default-snakeoil # Verify the new SSL certificates exist. ls -l /etc/ssl/certs/ssl-cert-snakeoil.pem /etc/ssl/private/ssl-cert-snakeoil.keyThen, we need to copy the files to our current directory.
cp -p /etc/ssl/certs/ssl-cert-snakeoil.pem .
cp -p /etc/ssl/private/ssl-cert-snakeoil.key .
Output1root@vps298933:~/wordpress-docker-image# apt-get -y install ssl-cert 2Reading package lists... Done 3Building dependency tree 4Reading state information... Done 5Suggested packages: 6 openssl-blacklist 7The following NEW packages will be installed: 8 ssl-cert 90 upgraded, 1 newly installed, 0 to remove and 4 not upgraded. 10Need to get 17.0 kB of archives. 11After this operation, 64.5 kB of additional disk space will be used. 12Get:1 http://fr.archive.ubuntu.com/ubuntu bionic/main amd64 ssl-cert all 1.0.39 [17.0 kB] 13Fetched 17.0 kB in 0s (442 kB/s) 14Preconfiguring packages ... 15Selecting previously unselected package ssl-cert. 16(Reading database ... 128224 files and directories currently installed.) 17Preparing to unpack .../ssl-cert_1.0.39_all.deb ... 18Unpacking ssl-cert (1.0.39) ... 19Setting up ssl-cert (1.0.39) ... 20Processing triggers for man-db (2.8.3-2ubuntu0.1) ... 21root@vps298933:~/wordpress-docker-image# make-ssl-cert generate-default-snakeoil 22root@vps298933:~/wordpress-docker-image# ls -l /etc/ssl/certs/ssl-cert-snakeoil.pem /etc/ssl/private/ssl-cert-snakeoil.key 23-rw-r--r-- 1 root root 1034 Nov 13 22:21 /etc/ssl/certs/ssl-cert-snakeoil.pem 24-rw-r----- 1 root ssl-cert 1708 Nov 13 22:21 /etc/ssl/private/ssl-cert-snakeoil.key 25root@vps298933:~/wordpress-docker-image# cp -p /etc/ssl/certs/ssl-cert-snakeoil.pem . 26root@vps298933:~/wordpress-docker-image# cp -p /etc/ssl/private/ssl-cert-snakeoil.key . 27root@vps298933:~/wordpress-docker-image# 28root@vps298933:~/wordpress-docker-image# ls -lh 29total 8.0K 30-rw-r--r-- 1 root root 0 Nov 13 22:21 Dockerfile 31-rw-r----- 1 root ssl-cert 1.7K Nov 13 22:21 ssl-cert-snakeoil.key 32-rw-r--r-- 1 root root 1.1K Nov 13 22:21 ssl-cert-snakeoil.pem 33root@vps298933:~/wordpress-docker-image#
We can now create our Dockerfile.
Dockerfile1# The base image 2FROM wordpress:apache 3 4# Enabling the SSL module 5RUN a2enmod ssl 6 7# Copy the SSL certs to the image 8RUN mkdir /etc/apache2/certs 9COPY ssl-cert-snakeoil.pem /etc/apache2/certs/ssl-cert.pem 10COPY ssl-cert-snakeoil.key /etc/apache2/certs/ssl-cert.key
Lastly, build and the new image. You can give any name, but this example uses
ssl-wordpress.docker build -t ssl-wordpress:latest .
Output1root@vps298933:~/wordpress-docker-image# docker build -t ssl-wordpress:latest . 2Sending build context to Docker daemon 6.656kB 3Step 1/5 : FROM wordpress:apache 4apache: Pulling from library/wordpress 5Digest: sha256:20bffad04c9c3e696b3c6fbc48d769c5948718b57af8c9457d9a0f28b5066b4b 6Status: Downloaded newer image for wordpress:apache 7 ---> 6edecd0f5c75 8Step 2/5 : RUN a2enmod ssl 9 ---> Running in cfa4595ed571 10Considering dependency setenvif for ssl: 11Module setenvif already enabled 12Considering dependency mime for ssl: 13Module mime already enabled 14Considering dependency socache_shmcb for ssl: 15Enabling module socache_shmcb. 16Enabling module ssl. 17See /usr/share/doc/apache2/README.Debian.gz on how to configure SSL and create self-signed certificates. 18To activate the new configuration, you need to run: 19 service apache2 restart 20Removing intermediate container cfa4595ed571 21 ---> 028793b3215f 22Step 3/5 : RUN mkdir /etc/apache2/certs 23 ---> Running in 66bf5da33f60 24Removing intermediate container 66bf5da33f60 25 ---> 8123001e5c7a 26Step 4/5 : COPY ssl-cert-snakeoil.pem /etc/apache2/certs/ssl-cert.pem 27 ---> 872b8b06ddc4 28Step 5/5 : COPY ssl-cert-snakeoil.key /etc/apache2/certs/ssl-cert.key 29 ---> 61532a6d1302 30Successfully built 61532a6d1302 31Successfully tagged ssl-wordpress:latest 32root@vps298933:~/wordpress-docker-image#
Output1root@vps298933:~/wordpress-docker-image# docker images 2REPOSITORY TAG IMAGE ID CREATED SIZE 3ssl-wordpress latest 61532a6d1302 23 minutes ago 546MB 4pandoc latest 79ad25bc9c62 4 hours ago 1.03GB 5pandoc default 7eb0798f4080 10 hours ago 720MB 6node latest f1974cfde44f 40 hours ago 935MB 7mariadb latest 2ab9d091310d 44 hours ago 414MB 8nextcloud latest 3ed6ea445002 7 days ago 811MB 9wordpress apache 6edecd0f5c75 7 days ago 546MB 10wordpress latest 6edecd0f5c75 7 days ago 546MB 11redis latest 62f1d3402b78 2 weeks ago 104MB 12node 6.10 3f3928767182 3 years ago 661MB 13root@vps298933:~/wordpress-docker-image#
4.4.3. Add SSL Configuration
The Apache webserver running in the new image called ssl-wordpress
supports both HTTP and HTTPS. We need to add a configuration
file for the WordPress site to use SSL. We do the same thing when
we create an Nginx site.
First, we need to create an Apache SSL configuration for WordPress to listen on port 433 (SSL). We will store these files in a volume directory called
apache.# Create the volume directory and file cd ~/wordpress-docker mkdir apache touch apache/site.conf
Add this information to
apache/site.conf.apache/site.conf1<VirtualHost *:80> 2 #ServerName www.example.com 3 DocumentRoot /var/www/html 4 5 ErrorLog ${APACHE_LOG_DIR}/error.log 6 CustomLog ${APACHE_LOG_DIR}/access.log combined 7</VirtualHost> 8<IfModule mod_ssl.c> 9 <VirtualHost _default_:443> 10 #ServerName www.example.com 11 DocumentRoot /var/www/html 12 13 ErrorLog ${APACHE_LOG_DIR}/error.log 14 CustomLog ${APACHE_LOG_DIR}/access.log combined 15 16 SSLEngine on 17 SSLCertificateFile /etc/apache2/certs/ssl-cert.pem 18 SSLCertificateKeyFile /etc/apache2/certs/ssl-cert.key 19 20 <FilesMatch "\.(cgi|shtml|phtml|php)$"> 21 SSLOptions +StdEnvVars 22 </FilesMatch> 23 <Directory /usr/lib/cgi-bin> 24 SSLOptions +StdEnvVars 25 </Directory> 26 </VirtualHost> 27</IfModule>
Next, we need to modify the
docker-compose.ymlso that the running container can use SSL.Change the image to
ssl-wordpress:latestCreate a volume for our custom
site.conffile.Tell the container to listen on port 443 by adding a new port map (20843:443).
Tip
We can the numbers 8 and 4 to differentiate between HTTP and HTTPS maps.
HTTP sites use port 80 or 8080. We use 208xx
HTTPS sites use port 443 or 4443. We use 204xx
docker-compose.yml. . . wordpress: depends_on: - db - redis image: ssl-wordpress:latest volumes: - ./wordpress:/var/www/html - ./apache/site.conf:/etc/apache2/sites-enabled/000-default.conf ports: - "20851:80" - "20435:443" restart: always . . .Restart and verify that the container responds to HTTPS requests.
docker-compose down && docker-compose up -d curl -k --head https://localhost:20435Outputroot@vps298933:~/wordpress-docker# docker-compose down && docker-compose up -d Stopping wordpressdocker_wordpress_1 ... done Stopping wordpressdocker_redis_1 ... done Stopping wordpressdocker_db_1 ... done Removing wordpressdocker_wordpress_1 ... done Removing wordpressdocker_redis_1 ... done Removing wordpressdocker_db_1 ... done Removing network wordpressdocker_default Creating network "wordpressdocker_default" with the default driver Creating wordpressdocker_redis_1 ... Creating wordpressdocker_db_1 ... Creating wordpressdocker_redis_1 Creating wordpressdocker_redis_1 ... done Creating wordpressdocker_wordpress_1 ... Creating wordpressdocker_wordpress_1 ... done root@vps298933:~/wordpress-docker# curl -k --head https://localhost:20435 HTTP/1.1 301 Moved Permanently Date: Fri, 13 Nov 2020 17:41:38 GMT Server: Apache/2.4.38 (Debian) X-Powered-By: PHP/7.4.12 X-Redirect-By: WordPress Location: https://localhost/ Content-Type: text/html; charset=UTF-8 root@vps298933:~/wordpress-docker#
The last step is to configure Nginx to operate on SSL. Change
proxy_passto HTTPS.Edit your blog Nginx site:
nano /etc/nginx/sites-available/blog.example.comOutput1server { 2 listen 80; 3 4 server_name blog.y.jj8i.com; 5 6 location / { 7 #proxy_pass http://localhost:20851; 8 proxy_pass https://localhost:20435; 9 proxy_set_header Host $host; 10 proxy_set_header X-Real-IP $remote_addr; 11 proxy_set_header X-Forwarded-For $proxy_add_x_forwarded_for; 12 } 13}
Restart Nginx and obtain an SSL certificate.
nginx -t
systemctl restart nginx
certbot --nginx
View the page in your browser to verify that WordPress has SSL.