Step 8: Create a Name-based Site
Table of Contents
The goal of this part is to create a site that is accessible using a
domain name it. It is different from the default site at
/var/www/html.
Domain Names
There are reasons that you will use a domain name.
First, the web standard uses domain names to access web sites instead of using an IP address.
Next, you can access different services on your VPS using different domain names. Using the IP address to access a web service lets you access a single site. You will learn how to create sub-domain names for your projects and web apps.
Using a domain name gives you access to free SSL technology that is easy to use. Otherwise, you’ll have to use a self-signed certificate if you want to use SSL to protect web traffic on your box.
There are many domain name registrars. We recommend purchasing one so that you don’t lose access to it. However, you can use a free one for temporary use or testing.
Namecheap
We used Namecheap to register jj8i.com. They offer a solid service
have competitive prices.
You should be able to access your site using the base domain (example.com) and the www subdomain (www.example.com).
See the knowledgebase article from Namecheap for additional information.
Log into your domain name registrar
Set the redirect domain to your IP address
Domain List -> Manage -> Domain Tab -> REDIRECT DOMAIN -> Source URL ->
http://IP-ADDRESS
Go to the domain manage page and click on “Advanced DNS”
Add a new record for the base domain
Type:
ARecordHost:
@Address: <your IP address>
TTL: Automatic (default value)
Add a new record for the www subdomain
Type:
ARecordHost:
wwwAddress: <your IP address>
TTL: Automatic (default value)
Click the green checkmark or press the Save all changes button
Wait several minutes before trying to ping the new sub-domain name.
You might have to wait several hours if you’re unlucky

Freenom
Freenom.com is a source for free domains names from TLDs .tk, .ml, ga, .cf, and .gq.
Navigate to Freenom.com.
Search for a domain name, select it, then checkout
Select the number of free months that you want (1-12)
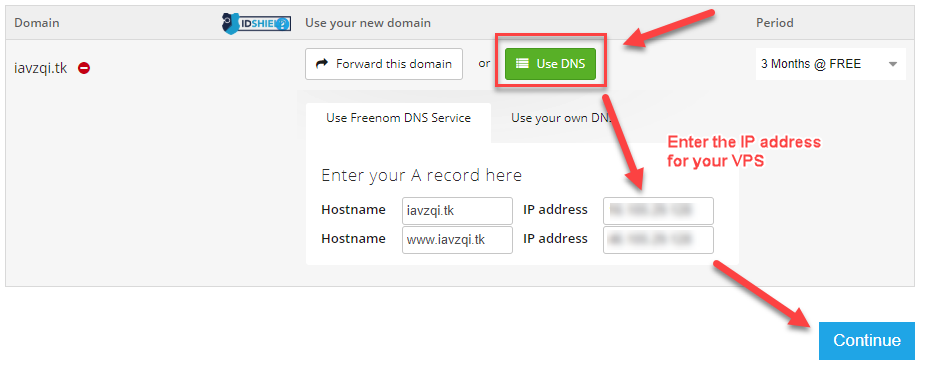
Click Use DNS and enter the IP address of your VPS
Verify your email address and then fill in your account information
Create a new Nginx Site
Log into your domain name registrar and point the root domain name (example.com) and the www subdomain name (www.domain.com) to the IP address of your VPS
Wait 2-3 minutes for the changes to take effect.
Don’t try it immediately.
Ping the domain name from a terminal (MobaXterm or Window’s CMD) to verify if it is active. Sometimes, it takes many hours for DNS entries to update.
C:\Users\user>ping example.com

Pinging example.com [46.105.29.128] with 32 bytes of data:
Reply from 46.105.29.128: bytes=32 time=133ms TTL=48
Reply from 46.105.29.128: bytes=32 time=137ms TTL=48
Reply from 46.105.29.128: bytes=32 time=134ms TTL=48
Reply from 46.105.29.128: bytes=32 time=134ms TTL=48

Ping statistics for 46.105.29.128:
    Packets: Sent = 4, Received = 4, Lost = 0 (0% loss),
Approximate round trip times in milli-seconds:
    Minimum = 133ms, Maximum = 137ms, Average = 134ms

C:\Users\user>
Now, we need to create the directory for the web files and the Nginx virtual host for our domain name
We should verify the config after we modify to detect errors.
First, we need to create a directory for the web files and create a basic HTML page.
mkdir -pCreates the directory structure.
- Flag
-p Informs the system to create deep directories (html) if the shallow ones do not exist (example.com).
chown -RChanges the directory owner from
roottowww-data. This is important for (1) security and (2) Nginx might not be able to access the files if they are owned by root.
sudo mkdir -p /var/www/example.com/html
sudo chown -R www-data:www-data /var/www/example.com/html
sudo nano /var/www/example.com/html/index.html
Add some simple HTML to the
index.htmlfile.index.html<html> <head> <title>Welcome!</title> </head> <body> <h1>Hello world!</h1> </body> </html>
Create the Nginx vhost file for the base domain and the www subdomain
The
server_namedirective in the Nginx site should have references to both, which identifiesexample.comandwww.exmple.comas the same.server_name example.com www.example.com;
sudo nano /etc/nginx/sites-available/example.com
/etc/nginx/sites-available/example.com1server { 2 listen 80; 3 listen [::]:80; 4 5 root /var/www/example.com/html; 6 index index.html index.htm index.nginx-debian.html index.php; 7 8 server_name example.com www.example.com; 9 10 location / { 11 try_files $uri $uri/ =404; 12 } 13 14 # pass PHP scripts to FastCGI server 15 # 16 location ~ \.php$ { 17 include snippets/fastcgi-php.conf; 18 fastcgi_pass unix:/var/run/php/php7.4-fpm.sock; 19 } 20}
Verify the config using
nginx -tWe should verify the config after we modify to detect errors.
If we don’t, then Nginx will not restart.
sudo nginx -t
Next, we need to enable the config, which tells Nginx to load the configuration file
To do, so, we’ll use the
lncommand to create a symbolic link from the file to the directory that contains all of the active configs
sudo ln -s /etc/nginx/sites-available/example.com /etc/nginx/sites-enabled/
1root@vps298933:~# sudo nano /etc/nginx/sites-available/example.com
2root@vps298933:~# sudo nginx -t
3nginx: the configuration file /etc/nginx/nginx.conf syntax is ok
4nginx: configuration file /etc/nginx/nginx.conf test is successful
5root@vps298933:~#
6root@vps298933:~# sudo ln -s /etc/nginx/sites-available/example.com /etc/nginx/sites-enabled/
Then, verify the link by viewing the contents of the
/etc/nginx/sites-enabled/lslists the files and folders in the specified directory.Flag
-lhprovides the files in a detailed list with human-readable file sizes.You can use whichever format you find easiest to read.
ls -lh /etc/nginx/sites-enabled/
1root@vps298933:~# ls -lh /etc/nginx/sites-enabled/
2total 0
3lrwxrwxrwx 1 root root 44 Mar 14 23:13 example.com -> /etc/nginx/sites-available/example.com
Next, restart Nginx and verify it is running
sudo systemctl restart nginxsudo systemctl status nginx
Test your web page
Using curl:
curl example.comUsing your web browser: http://example.com
If it works, you should see your
hello worldpage. Now, you are ready to install an SSL cert!
Add an SSL Cert to your site
Install Certbot to create SSL certs using Let’s Encrypt
Certbot is a third-party application maintained by EFF (Electronic Frontier Foundation) to provide free SSL certificates. EFF releases Certbot as a snap application on Ubuntu to simplify using the tool. You will learn more about snaps during the next lab. These steps are taken from EFF’s Certbot installation instructions page.
Install snapd and update
sudo snap install core; sudo snap refresh coreInstall Certbot
sudo snap install --classic certbot
Prepare the Certbot command to execute outside of the snap folder
sudo ln -s /snap/bin/certbot /usr/bin/certbot
Now, we can use Certbot to encrypt HTTP traffic on our
domain nameand thewwwsubdomain name.Run the
certbotcommand and select the site to encrypt
sudo certbot --nginx
 1 root@vps298933:~# certbot --nginx
 2 Saving debug log to /var/log/letsencrypt/letsencrypt.log
 3 Plugins selected: Authenticator nginx, Installer nginx
 4 Enter email address (used for urgent renewal and security notices)
 5  (Enter 'c' to cancel): user@example.com
 6
 7 - - - - - - - - - - - - - - - - - - - - - - - - - - - - - - - - - - - - - - - -
 8 Please read the Terms of Service at
 9 https://letsencrypt.org/documents/LE-SA-v1.2-November-15-2017.pdf. You must
10 agree in order to register with the ACME server at
11 https://acme-v02.api.letsencrypt.org/directory
12 - - - - - - - - - - - - - - - - - - - - - - - - - - - - - - - - - - - - - - - -
13 (A)gree/(C)ancel: a
14
15 - - - - - - - - - - - - - - - - - - - - - - - - - - - - - - - - - - - - - - - -
16 Would you be willing, once your first certificate is successfully issued, to
17 share your email address with the Electronic Frontier Foundation, a founding
18 partner of the Let's Encrypt project and the non-profit organization that
19 develops Certbot? We'd like to send you email about our work encrypting the web,
20 EFF news, campaigns, and ways to support digital freedom.
21 - - - - - - - - - - - - - - - - - - - - - - - - - - - - - - - - - - - - - - - -
22 (Y)es/(N)o: y
23
24 Which names would you like to activate HTTPS for?
25 - - - - - - - - - - - - - - - - - - - - - - - - - - - - - - - - - - - - - - - -
26 1: y.jj8i.com
27 2: www.y.jj8i.com
28 - - - - - - - - - - - - - - - - - - - - - - - - - - - - - - - - - - - - - - - -
29 Select the appropriate numbers separated by commas and/or spaces, or leave input
30 blank to select all options shown (Enter 'c' to cancel): 1,2
31 Obtaining a new certificate
32 Performing the following challenges:
33 http-01 challenge for www.y.jj8i.com
34 http-01 challenge for y.jj8i.com
35 Waiting for verification...
36 Cleaning up challenges
37 Deploying Certificate to VirtualHost /etc/nginx/sites-enabled/y.jj8i.com
38 Deploying Certificate to VirtualHost /etc/nginx/sites-enabled/y.jj8i.com
39 Redirecting all traffic on port 80 to ssl in /etc/nginx/sites-enabled/y.jj8i.com
40 Redirecting all traffic on port 80 to ssl in /etc/nginx/sites-enabled/y.jj8i.com
41
42 - - - - - - - - - - - - - - - - - - - - - - - - - - - - - - - - - - - - - - - -
43 Congratulations! You have successfully enabled https://y.jj8i.com and
44 https://www.y.jj8i.com
45 - - - - - - - - - - - - - - - - - - - - - - - - - - - - - - - - - - - - - - - -
46 Subscribe to the EFF mailing list (email: tony.hetrick@live.com).
47
48 IMPORTANT NOTES:
49  - Congratulations! Your certificate and chain have been saved at:
50    /etc/letsencrypt/live/y.jj8i.com/fullchain.pem
51    Your key file has been saved at:
52    /etc/letsencrypt/live/y.jj8i.com/privkey.pem
53    Your cert will expire on 2021-02-09. To obtain a new or tweaked
54    version of this certificate in the future, simply run certbot again
55    with the "certonly" option. To non-interactively renew *all* of
56    your certificates, run "certbot renew"
57  - Your account credentials have been saved in your Certbot
58    configuration directory at /etc/letsencrypt. You should make a
59    secure backup of this folder now. This configuration directory will
60    also contain certificates and private keys obtained by Certbot so
61    making regular backups of this folder is ideal.
62  - If you like Certbot, please consider supporting our work by:
63
64    Donating to ISRG / Let's Encrypt:   https://letsencrypt.org/donate
65    Donating to EFF:                    https://eff.org/donate-le
66
67 root@vps298933:~#
Finally, refresh your page by pressing Ctrl+F5. You should see your new cert.