Step 2: Configure Nginx using the Command Line
Table of Contents
We are running Nginx on ports 80 and 443. Our firewall is blocking port 3000. We could open the firewall and direct our clients to use port 3000. However, users are accustomed to using the domain name only. We don’t want to have to remember to use port 3000 or 8080. We like domain names! We’ll let Nginx do the conversion for us. This functionality is the power of a reverse proxy.
At this point, we have the application running on port 3000. We could open up the port on the firewall, but we’ll use Nginx as a reverse proxy. We will add additional services during this lab.
Note
These instructions use example.com. You will use your own domain name.
For this part of the lab:
We will create a new sub-domain name for our service called
chat.example.com.We will configure Nginx to watch for
chat.example.comand then direct that traffic tolocalhost:3000.This process works because we can associate many names with a single IP address.
For the other applications running on the server that we can configure easily, we’ll use ports 20850-20865 for HTTP data and then 20450-20465 for HTTPS. We can use any open port, but we’ll use a range that services rarely use.
Nginx will route the traffic to each service based on the domain name.
s1.example.com might route to port 20852.
s2.example.com might route to port 20475.
You might ask why we don’t use port 80 for everything. Ports on a computer have a restriction that only one process can bind to a port at a time. Right now, our Nginx web server is binding to ports 80 and 443. No other application can use those ports. So, they have to use different ports. Python projects commonly use port 3000, such as Rocket.Chat. Other projects might use port 8000.
2.1. Create sub-domain chat.example.com
We need our sub-domain name that points to our VPS before our reverse proxy will work.
Tip
Here are the instructions for Freenom and Namecheap. You will have to find the instructions if you used a different registrar.
Freenom
Freenom.com is a source for free domains names from TLDs .tk, .ml, ga, .cf, and .gq.
Add your subdomain names.
You might have to wait several hours if you’re unlucky
Namecheap
See the knowledgebase article from Namecheap if you used their services.
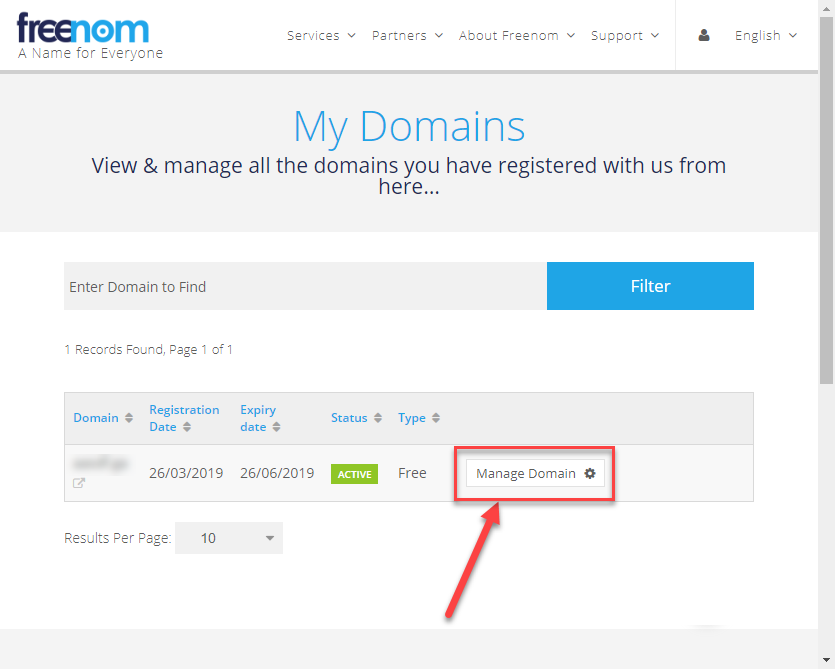
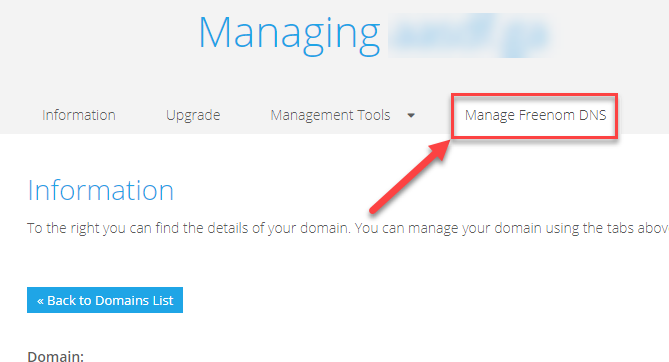
To create sub-domain name chat.example.com:
Log into your domain name registrar
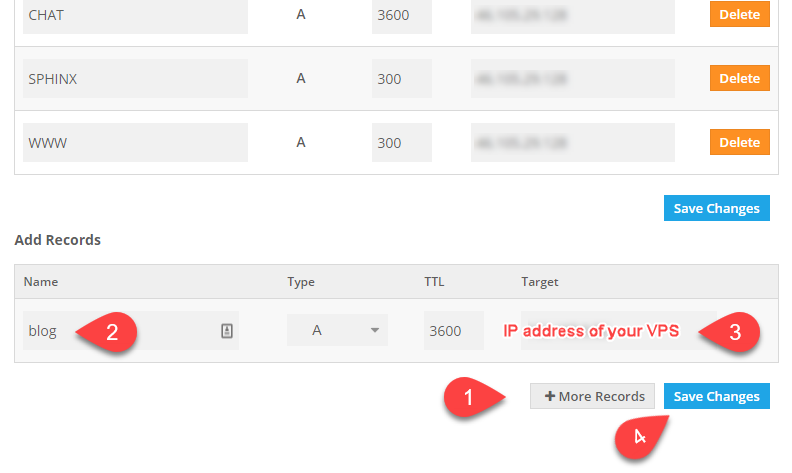
Add a new record
Type:
ARecordHost: chat
Address: <your IP address>
TTL: Automatic (default value)
Click the green checkmark or press the Save all changes button
Wait several minutes before trying to ping the new sub-domain name.
You might have to wait several hours if you’re unlucky

2.2. Create the Nginx Site
These instructions explain how to enable an Nginx config file using the command line. Next, we’ll look at how to create the site using Ajenti.
Create the new Nginx config file and copy the file contents.
Right-click in the terminal window to paste the code.
Press Ctrl+X to exit
Press y to save the changes
nano /etc/nginx/sites-available/chat.example.com
File contents of /etc/nginx/sites-available/chat.example.com1server { 2 listen 80; 3 4 server_name chat.example.com; 5 6 location / { 7 proxy_pass http://localhost:3000; 8 proxy_set_header Host $host; 9 proxy_set_header X-Real-IP $remote_addr; 10 proxy_set_header X-Forwarded-For $proxy_add_x_forwarded_for; 11 } 12}
Enable the Nginx Site
Ubuntu uses folders that determine if a site is enabled or disabled. You will find two folders in
/etc/nginx/sites-availablecontains that sites that are configured but not active.sites-enabledcontains the sites that are active and accepting connections.
Instead of moving a file between
sites-availableandsites-enabled, all files physically remain insites-available. A user creates a symbolic link tosites-enabledto make the site active. Linux file system treats the link as the actual. Once the link is made, a user can edit the same file in either directory.ln -screates a symbolic link to an existing file.ln -s source destinationln -s /etc/nginx/sites-available/chat.example.com /etc/nginx/sites-enabled/creates a link ofchat.example.comin folder/etc/nginx/sites-enabled/
ln -s /etc/nginx/sites-available/chat.example.com
/etc/nginx/sites-enabled/
Once this link is made, view the directory contents using
ls -lh. You will see the link.ls -lh /etc/nginx/sites-enabled/
Outputroot@vps298933:~# ls -lh /etc/nginx/sites-available/ total 12K -rw-r--r-- 1 root root 2.4K Mar 16 22:35 default -rw-r--r-- 1 root root 1.1K Mar 19 21:01 y.jj8i.com -rw-r--r-- 1 root root 277 Mar 19 20:40 www.y.jj8i.com root@vps298933:~# root@vps298933:~# ls -lh /etc/nginx/sites-enabled/ total 0 lrwxrwxrwx 1 root root 34 Mar 16 22:28 default -> /etc/nginx/sites-available/default lrwxrwxrwx 1 root root 34 Mar 16 22:44 y.jj8i.com -> /etc/nginx/sites-available/y.jj8i.com lrwxrwxrwx 1 root root 39 Mar 19 20:39 www.y.jj8i.com -> /etc/nginx/sites-available/www.y.jj8i.com root@vps298933:~#
Verify that there are no configuration issues
sudo nginx -t
Outputroot@vps298933:~# sudo nginx -t nginx: the configuration file /etc/nginx/nginx.conf syntax is ok nginx: configuration file /etc/nginx/nginx.conf test is successful
Restart Nginx and verify that it restarted without errors
sudo systemctl restart nginx
sudo systemctl status nginx
Now, let’s verify that the reverse proxy is working correctly. We will use
curlto access the site using the domain name.The file is very large.
If something is wrong if you see the default Nginx HTML.
Expected Outputroot@vps298933:~# curl http://chat.y.jj8i.com <!DOCTYPE html> <html> <head> <meta name="referrer" content="origin-when-crossorigin"> <script>/* eslint-disable */ 'use strict'; (function() { var debounce = function debounce(func, wait, immediate) { var timeout = void 0; return function () { var _this = this; . . . configCalled%22%3Atrue%2C%22isModern%22%3Afalse%7D"))</script> <script type="text/javascript" src="/498130460737d5eb424ed320e4abde4f744cfe8b.js?meteor_js_resource=true"></script> </body> </html>root@vps298933:~#
Lastly, we should add the SSL certificate using
certbot.SSL certificates are free and easy to install.
Let’s promote a secure web!
sudo certbot --nginx
If everything is successful, you should be able to access your chat application using your web browser.
Here is the URL to my box: http://chat.y.jj8i.com
Navigate to the URL using your web browser and configure Rocket.Chat
You should set the admin password before someone else finds the site. :))
Sever type: Private Team
Register Server: Keep standalone
Congratulations! You have just installed a complex application and routed it through your web server.